

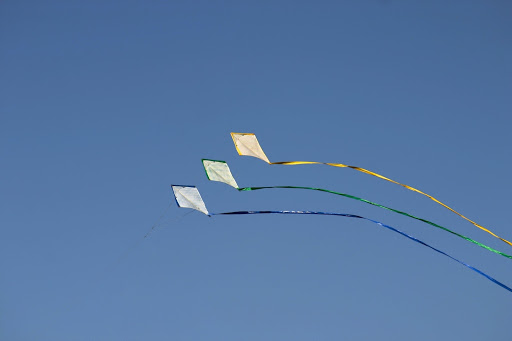
Have you ever wondered how planes can take flight? Well, the physics that helps them to fly works very similarly for kites. Physics is a branch of science that deals with the interactions between energy and matter! Let’s try our hand at making a kite. Then, we’ll dive into some potential STEM career paths in physics.
MATERIAL LIST:
- Ball of string
- Cardboard or heavy paper
- Masking tape
- Matches
- Plastic garbage bag
- Two thin dowels (approximately 28–36 inches long, ⅕ inch thick)
- Scissors
- Ribbon
INSTRUCTIONS:

- Cut off the bottom and side surfaces of the bag, so it becomes square-shaped. On a flat area, open up the bag.
- Place the dowels about 20 inches apart, making sure there is an equal amount of plastic between the edge of the bag and the dowel on each side. Tape the two dowels vertically onto the bag.
- Measure 10 inches from each of the top corners of the bag. Make two marks – one on each spot. Using those points as a reference, make another two marks 10 inches downwards. From those points, draw lines to the top of the cane and draw ones to the bottom.
- You should see a triangle shape start to form alongside each dowel. Use scissors to cut across these lines. The kite should now start to resemble the image to the right.
- Use a match to help you fold the two corners of the kite, turning your triangle shapes into trapezoids, as seen in the image. Apply masking tape to secure these folds.
- Poke two tiny holes on the folds you just made, between the masking tape and the edge of your kite. To form a bridle, or the group of strings that hold the kite at the proper angle during flight, take the string and tie it through the two holes so that it forms a U-shape around the bottom of the kite, similar to the image above. .
- Cut two slits forming at a point toward the lower end of the kite (each about 6 inches long).
- Lastly, at the tow point, or where you attach the string you’ll hold while flying the kite to the bridle, secure the remaining ball of string to the bridle.
- Tape long strips of ribbon to the bottom edge of the kite to add a tail.
- Your kite should now be complete and ready to fly!
TIPS FOR SAFETY AND SUCCESS:
When flying your kite, something to keep an eye on the weather. It is best to operate your kite on a windy day because the wind needs to be consistent so that the kite will stay in the air. When releasing your kite, make sure to do so when you feel the wind pressure against the kite. You can eventually release more and more of it to cause your kite to travel higher. Another recommendation is avoiding being near trees and powerlines, as this is a safety hazard. Make sure you fly your kite away from pets and always have the help and support of an adult.
CHALLENGES:
If you feel like this experiment was too easy and want more of a challenge, build a new kite to compare against your original one, and use different materials and a smaller or larger bag.
ASK YOUR YOUNG STUDENTS:
How would the kite fly if you added tails? Or if you altered the size of the kite, making it smaller or larger? Also, how would the kite fly if the tails add on were different lengths?
WHAT IS THE SCIENCE?
The first parts of flight are releasing and launching. To fly a kite, one needs to create enough lift to neutralize the kite’s weight, or, in other words, give the kite more height to balance out its weight. The velocity, or how fast something moves in a single direction, of air flowing past the kite affects the lift created. This is why it is easier to fly a kite when it is windy. Another factor is the kite’s design. If it has simple, lightweight, and sharp features, it will be more successful in flight.
The second parts are climbing and cruising. These two factors deal with the second part of flight, which require balance and equilibrium of forces. This means that these forces need to be evenly distributed across all parts of the plane. Any movement will affect the kite’s balance and cause it to move in various ways. So, the kite will continue moving at the same altitude if no factors disrupt its balance.
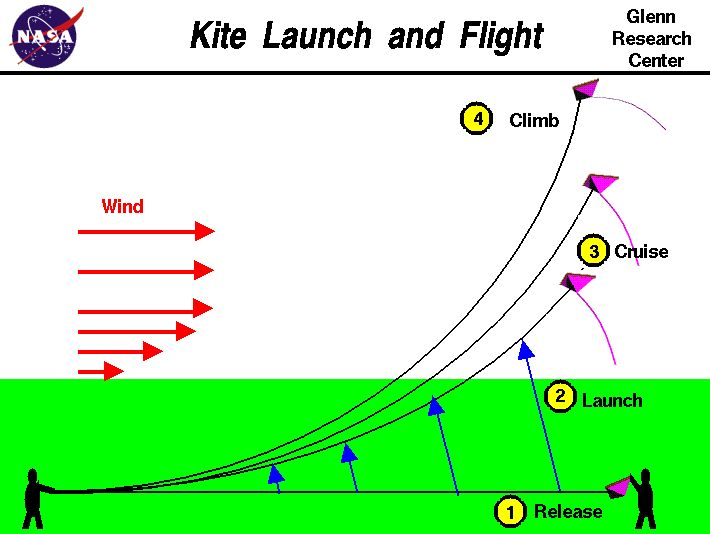
https://www.grc.nasa.gov/WWW/k-12/airplane/kitefly.html
Primary Elements of Flight
To help us understand how kites work even better, let’s go through some basic principles of flight: lift, weight, thrust and drag. First, lift is the change in air pressure above and below the kite. Weight occurs as gravity continuously pushes our kite downward. Next comes thrust, which can be defined as the constant push forward due to wind. Finally, drag is a term related to thrust. If the drag weighs less than the thrust: the kite speeds up. We can also use planes as an example, if we take a look at the image below.
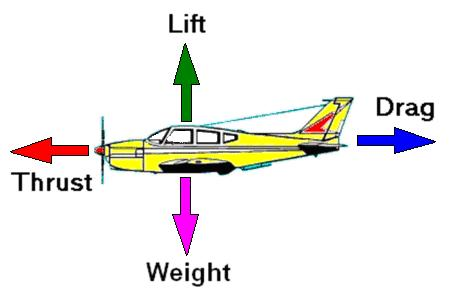
How can an airplane keep going forward if it has no thrust?
Bernoulli’s Principle
This principle essentially states that air pressure will decrease if the speed of the object has increased. In other words, the faster your kite flies, the easier it will be to keep it in the air. This is why it’s so important to get a running start with your kite.
Related Careers
Are you interested in this type of physics, but you aren’t sure what careers out there deal with this subject? Let’s take a quick look at some related jobs.
First, an aerospace engineer is an occupation that heavily involves collaboration with other individuals to develop and build space or aircrafts. Aerospace engineers have a lot of background experience in a wide variety of fields like aerodynamics, earth sciences and biology. The YouTube video, Aerospace Engineer – Career Spotlight gives a quick explanation. I would recommend watching it if this type of job interests you!
Next, flight technicians supervise the maintenance and testing of aircrafts and their control systems. There are varying types of technicians, including avionics, aerospace, and aircraft mechanics. They are critical to making sure that air travel is safe and effective for all!
STEM Family Week is happening July 27-July 31 with virtual and onsite programming all week long. For more information about STEM Family Week visit CTScienceCenter.org.