

Have you ever wanted to grow your own vegetables, but been unsure of where to start? This guide will give you some ways to reuse your kitchen scraps to grow your own vegetables at home! It is a great way to repurpose produce that might be wilting or starting to sprout – those fruits and veggies are ready to grow new plants! There are many online resources about how to re-grow your vegetable scraps, but I want to share a few that the Connecticut Science Center’s STEM Education team has had success with!
Green Onions:
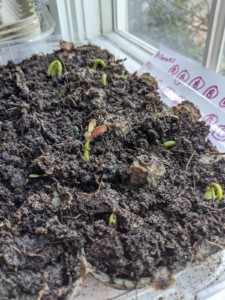
One of my favorite additions to dinner is some sliced green onion! When you slice a green onion, leave about an inch or two of the plant still attached to the roots (usually this is the white colored part most people throw out anyway). Place the onion cut side up in a little water, and over time those white onion-bottoms will start to sprout new green leaves. You should be able to keep them growing in a glass with some water on the bottom for a few weeks. If the green growing parts start to slow down, it is time to transfer those onions to some soil. There, they will be able to gather more nutrients to continue to grow green leaves. Here are some of my green onions in a cup of soil in my windowsill! This is about 2 weeks’ progress in soil, not enough to trim for dinner yet, but they’re getting there!
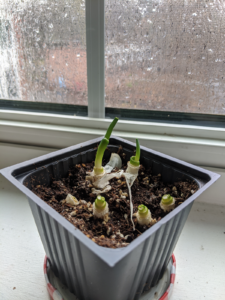
(Tiny green onion sprouts in my windowsill! – Photo Credit: Jessie Scott)
Tomatoes:
If you have tomatoes that are starting to go soft on you, now is a great time to slice them up and try to grow your very own tomato plants! First, fill a container most of the way full of potting soil or dirt. Next, add a tomato slice on top. Finally, sprinkle some more dirt on top of the slice. You should be able to see tomato sprouts coming from the slimy little seeds in 1-2 weeks!
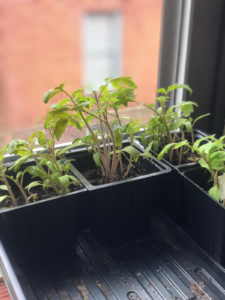
(Tomato plants sprouted from tomato slices – Photo Credit: Justin Riley)
Bell Peppers:
When you slice open a bell pepper and remove the seed-filled center, don’t be so quick to throw those seeds in the trash! You can plant them instead! If you put the pepper seeds in a damp paper towel for a few days, they should start to sprout, and then you can carefully transfer them to a pot filled with soil, or out to your garden!
Garlic:
This is one of my absolute favorite plants to grow in my yard because it is so easy and so delicious! In order to grow garlic, you need to start with a bulb of garlic from the grocery store or farmer’s market. When you get your bulb of garlic, separate the individual cloves. Each clove will be used to start a new plant (Burpee). Plant the cloves 4-6 inches apart and cover them with 1-2 inches of soil. Make sure you plant them pointy side up, that will be the side that the sprout comes out of! Garlic needs to be planted in well-draining soil because the underground bulb is the part that we all love to cook with, and if it gets too soggy it might rot. You can plant garlic in the spring or fall – if you plant it in the fall, make sure to cover it with a thick layer of leaf litter or straw to insulate the plants against the frost and snow!
Partway through the summer, you will find these awesome, curly-looking stems coming up from your garlic plant. These are called garlic scapes, and they are the flower stalks of your garlic plant! Cut the garlic scape stems where they meet the top set of leaves. See the photo below for a visual representation of where to cut! Removing them will lead to your garlic plant putting less energy into making flowers and seeds, and more energy into making a nice, big bulb of garlic underground. These scapes are delicious and you can find many recipes to use them in, like my personal favorite – scape pesto! Your garlic bulbs will be ready for harvest around the end of June or early August – you’ll know it is time when the leaves start to turn brown. Dig up your beautiful new garlic bulbs and place them somewhere warm and dry with good ventilation so they can dry out for storage!
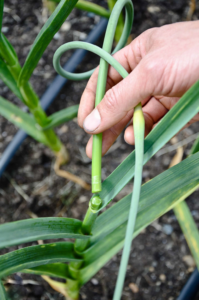
(A farmer breaks off a curly garlic scape – they are delicious to use in recipes! Photo Credit: Seattle Urban Farm Company)
Other Scraps to Try:
- Pineapple: I have heard that you can twist off the leafy top of a pineapple you got in the grocery store and place it in water to grow roots – I gave this one a try and ended up with a moldy mess instead (Today’s Homeowner). But, I would encourage you to try if you have a pineapple top lying around!
- Celery: You may also have better success than I did at growing new celery stalks out of a celery base – I forgot to water mine, and it totally dried out on me! If you chop off the celery stalks making sure to leave a couple of inches of celery stalk attached to the bottom of the bunch and place it in water in a sunny place, you can grow new little celery stalks (AllRecipes).
- Potatoes: If you have potatoes that are starting to grow little knobs all over them, those are the starts of a new plant growing from the eyes of the potatoes. Try cutting the potato into large chunks that have an eye, and place them in soil, eye-side up (Seed Savers Exchange). Make sure you give them plenty of room because potatoes grow very large plants.
Here are some sprouted plants from our STEM Education Team!
(Green peppers sprouted from seed – Photo Credit: Justin Riley)
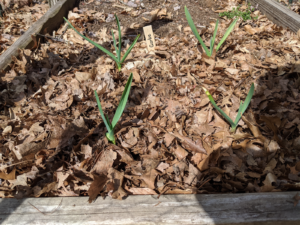
(Baby garlic plants in the garden – Photo Credit: Kate Saulsbery)
(Bean sprouts – bonus points for being eco-friendly and reusing an old egg carton to start the plants! Photo Credit – Kate Saulsbery)
More to Explore:
A time-lapse of a bean sprout – this video just makes me happy
A timelapse of an avocado plant growing from an avocado pit
Let us know what plants you try to grow and what works for you – trial and error is part of the fun with plants! Tag us with @CTScienceCenter and #ScienceAtPlay to share your gardening adventures with us, we would love to see them!

Jessie Scott is a STEM Educator who enjoys encouraging students’ enthusiasm for science. She teaches classes to students visiting the Science Center and brings STEM lessons to schools across Connecticut. Jessie completed her Master of Science degree in Microbiology at Dartmouth College and worked as a science educator at the Montshire Museum of Science before coming to the Connecticut Science Center. Her scientific interests are: biology – how living things have adapted different strategies to survive in their environments, insects, and plants. In her free time, Jessie likes to go rock climbing, hiking, and skiing.