

Renovators, makers, inventors, and anyone who desires the pure unbridled satisfaction of doing it yourself, this is the blog for you. Here we will be taking a closer look at some of the tools that help you create all those Pinterest projects you’ve been saving. Are these tools dangerous? Yes! Do they multiply your effort towards a custom home and satisfying life? Also yes! With a deeper understanding of how these tools work, we can hopefully replace the do’s and don’ts with a philosophy of safety. We will use custom-filmed photography and slow-mo footage to understand what is happening after you measure twice.
One of the most wonderful and fulfilling exercises in making is to take a stock piece of lumber and build a functional or decorative object. From idea, through design, layout, cutting, assembling and finishing, the more harmonious your thought process, the more gratifying the project. If given the chance, watch an intuitive trigonometry wizard known as a carpenter do their work. The way they visualize how pieces come together through multiple cuts, angles, and rotations can be a feat to spectate, especially “Finish or Trim Carpenters” with their decorative mouldings and trim pieces. The way they keep precise fractions, angles, and final positioning all in mind at the same time still puts me in awe. Cutting lumber materials to size seems simple, but can be full of potentially expensive or dangerous pitfalls. Here we will explore the basic anatomy and types of saws.
While the anatomy of a saw tooth is rather simple, how these many teeth are assembled into a blade and how that blade functions vary widely to enable the easiest solution to the cutting task at hand. Some saws can perform many functions, with varying degrees of precision, ease, or safety, while other saws excel at one particular task. In this post we will explore additional considerations that need to be made when measuring twice in order to make the perfect cut once.
In order to begin this topic with relative ease, we will focus only on wood saws. Wood is after all the paragon of sustainable materials. You wouldn’t start an english language learner with all the weird exceptions and slang which we all use fluently. I imagine a future post on specialty saws for steel, concrete, tile, and more will come with time.
All saw teeth are merely a series of chisels designed to shave off material when the blade is moving in one direction. The style of tooth varies depending on the type of motion that causes the blade to move. Hand saws are meant to operate in a back-and-forth straight line fashion and typically have their cutting edge on the side of the tooth (fig. 1, note the shine of the beveled cutting edge). These cutting edges alternate sides with every other tooth as to keep the saw cutting on a straight line. Power saws are only meant to operate with the blade moving on one direction, either in a spinning fashion or a reciprocal fashion. Typically, their cutting edge is horizontal on the end of the tooth (fig.2 like chisels mounted perpendicular to the blade, shaving material away at 4,000 rpm). The bevel at the end of each tooth alternates pointing slightly to one side than the other of the blade for the same tracking reason as hand saws.

Fig.1 Hand Saw Blade Fig. 2 Power Saw Blade
A key detail must be remembered when cutting materials with a saw–the material in the path of the saw is wasted and turned into saw dust. The width of the blade (or kerf) will determine how much material is lost in the cut. This needs to be accounted for when laying out your cuts and lines on your material. Everyone maintains their own system for doing this. I typically place the mark of my line one blade’s width past the measurement I need, and then aim to cut that line away, turning it into saw dust, leaving behind the dimension I need. When making multiple cuts in a row on a single piece, I make sure to favor the same side of the measurement each time to avoid one piece being two blade widths too small when assembling finished pieces.
Rotary Saws
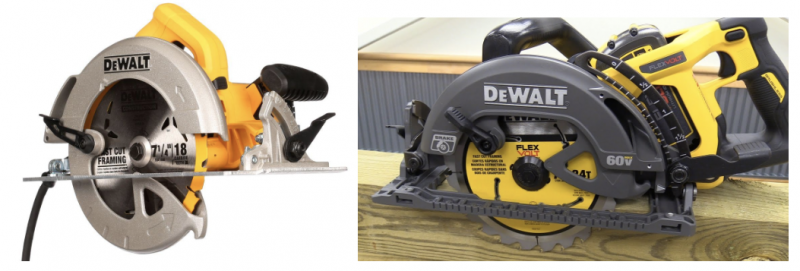
The best type of saw needed for a task is mostly dependent on how straight the cut is. Saws with circular blades excel at making straight cuts even on angles. These saws also vary greatly in their mobility and size. These tools have been the cornerstone of construction for generations now, so much like facial tissue, certain brand names have become synonymous with a style of saw. I will be using the most generic names for these saws.
| Saw Type | Cost | Portability | Versatility | Best Use | Other Thoughts |
| Circular | Inexpensive | Handheld. Corded or Battery Powered | Very versatile | Straight, controlled depth cuts even at angles | Dusty, large difference in power between corded and battery models |
| Miter | Can be Expensive | Corded or Battery Powered | Somewhat versatile | Precise angles on narrow material like trim for doors, windows, and crown moulding | Dusty, much safer than circular saw for small and precise cuts |
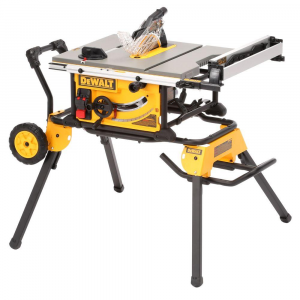
| Table | Expensive | Typically stationary. portable models work | Somewhat versatile | Repeated precise cuts, including angles, for large projects | The workhorse of most carpenters, old and heavy models usually still work great. |
Circular Saw: handheld, allows for adjustments to depth and angle of the blade
Miter Saw/Chop Saw: comes on stand and locks into different angles, quick to use
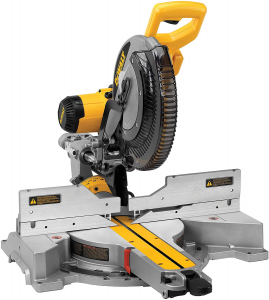
Table Saw: a circular spinning blade mounted sticking up through a flat table. Stationary or transportable (tradeoff here: heavy, rigid, precise and stationary, or much lighter, smaller, a bit less precise and transportable), dust is much more controlled
Linear Saws
When precise, curved cuts are needed, a thin blade that works in a straight line is best. Most of these saws use a blade that reciprocates (moves back and forth), while my favorite saw, the band saw, has a continuous blade that moves only in one direction. As you see in the slow-mo, saws that reciprocate have a great deal of vibration which makes them difficult to keep on your cut line.
| Saw Type | Cost | Portability | Versatility | Best Use | Other Thoughts |
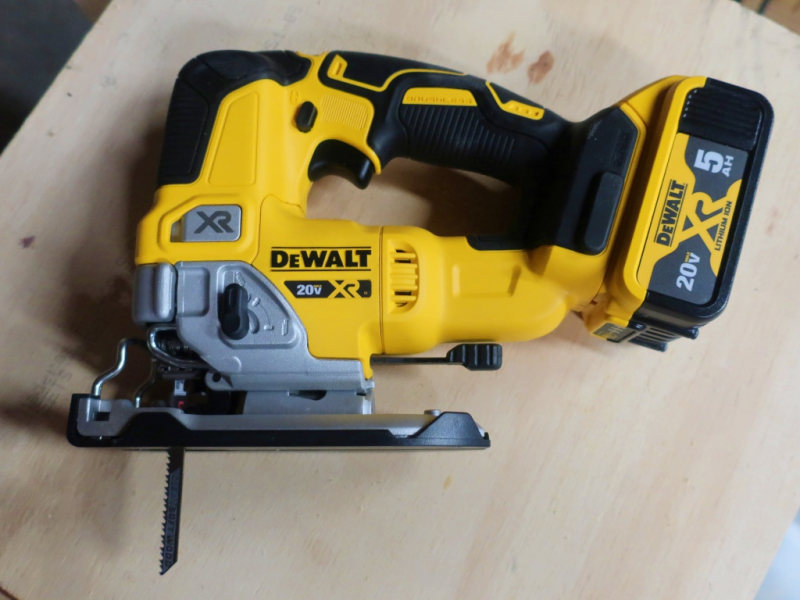
| Jig | Inexpensive | Handheld. Corded or battery | Very versatile | Complex and tight curves. Different blades for many different materials | Speed control helps to adjust to different materials, vibrations can be difficult to control |
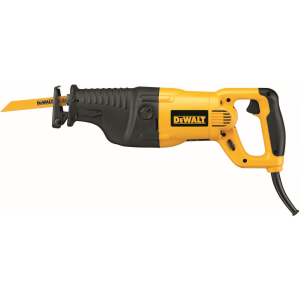
| Reciprocating | Fairly inexpensive | Handheld. Corded or battery | Fairly versatile | Demolition. Many different blades for different materials including tree pruning | Makes you feel powerful, vibrations can be very difficult to control |
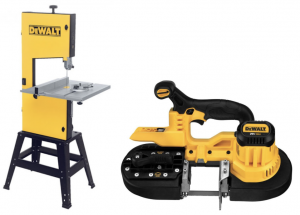
| Band | Can be expensive | Typically stationary, portable models usually for metal | Fairly versatile | Curves, even on an angle. Many different blades for different materials | Very safe, very predictable blade |
Jig Saw: Free-hand curve cutting pro.
Reciprocating Saw: The workhorse of demolition can be used cut through nails, studs, and anything else found in a wall. Can be very difficult to control.
Band Saw: Safest saw type (blade only moves in one direction and in one place), this is often the first saw beginners learn to cut material on.
Hand Saws
When seeking healthy exercise and copious amounts of personal satisfaction, there is nothing like sawing by hand. Additionally, there are still some tasks that are best performed by hand. Hand saws have the ability to be exceptionally precise (depending on skill), ultimately portable, and are always cordless! Generally speaking there are two types of hand saws, Western saws that cut on the push stroke and Eastern saws that cut on the pull stroke. The difference in appearance comes down to the handles. A pull saw has a longer straight handle while the push saw has a recognizable up-and-down handle. On closer inspection, the teeth are designed completely differently as to remove material on different strokes. Personally, I have much better success and precision using a pull saw. I feel that I have much better control over the straightness, direction, and angle of the cut while also maintaining the ability to cut across, as well as with, the grain of the wood (most push saws cannot make cuts parallel with the grain or rip cuts).
| Saw Type | Cost | Portability | Versatility | Best Use | Other Thoughts |
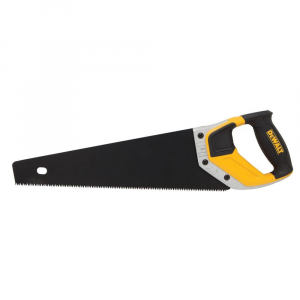
| Western Push | Very inexpensive | Extremely portable | Depends on size | Personal satisfaction | Familiar, old school, hard to get a cut started |
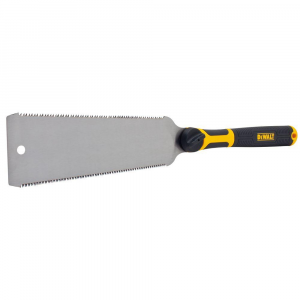
| Eastern Push | Very inexpensive | Extremely portable | Depends on space around the cut, but blade is often two sided, fine and course | Personal satisfaction | New to the west, but much easier to use than a push saw |
Western Style Hand Saw: What we would all consider the original hand saw. Note in the slow-mo, saw cuts on the push stroke
Eastern Style Pull Saw: gaining in popularity due to their versatility (often with fine and coarse tooth sides), size, and ease of use. Some designs can make cross-cuts and rip cuts.
Safety, Or How To Keep All Your Fingers
There are mainly two things to keep in mind, other than where are all my fingers: 1. How does this saw cut? 2. Is my work piece secure before and after the cut? By understanding how the saw cuts, you can better understand what the saw might do if you run into trouble. Remember to keep your fingers as far away from the saw blade as possible. When using a table saw or band saw, best practice is to use sticks to push the material past the blade. These push sticks are often custom made by the woodworker to fit their needs.
- How does this saw cut?
Each saw is slightly different but, all power saws cut with the point of the tooth coming towards a flat surface. Table saw and miter saw blades cut with the tooth pointing towards the table or stand you put the material on. When the teeth of the blade come in contact with the work piece, it is pushed against that surface. A miter saw cuts from the bottom of the blade with the teeth pointing away from you, this sends saw dust, and anything that goes flying, away from your body. A table saw cuts from the top of the blade as it spins, the teeth pointing towards you, and can “kick back” and send material back towards your body. Leather woodworking aprons are used to prevent any material from breaking the skin, but you can still suffer quite a bruise.
A circular saw is slightly different. The flat surface that the teeth are cutting towards is actually part of the saw itself. This plate can be adjusted in two different ways. First to adjust the depth of the cut, you adjust how far the blade protrudes down past the plate. Secondly, the angle of the blade to the plate enables cutting bevels especially on material too long for a Miter saw. In order for the saw to cut safely, the blade cuts from the underside of the material towards the surface you put the saw on. If the blade spun the other way, the saw might want to grip the material and be ripped right from your hands and run off. If the saw blade were to suddenly stop at a knot or a hidden nail, the saw would push back into your hands.
Jig saws and reciprocating saws are tricky because of the great deal of vibrations they make. With these saws, just like the circular saw, it is important to push the plate or foot (reciprocating saw) of the saw firmly into your work piece. It is important to note that these saws only cut on the pull stroke, but the push stroke causes a great deal of the vibrations. Keep in mind that the space beyond your work piece also needs to be clear as the blades of power saws, especially these two, often cut deeper than the workpiece.
- Is my work piece secure before and after the cut?
Clamps, clamps, and more clamps. If you ever need a gift idea for a woodworker, its clamps. They are not just handy for holding pieces together as glue dries, they can also secure pieces to the table or workbench you are working on. Firmly clamping the piece that you will cut will free your hands to hold the dangerous tool you are using, and will ensure that your cut is precise and steady. Clamping will also prevent a heavy piece that you have cut off from breaking off before the cut is complete, pieces crashing to the ground, smashing your toe, making such a loud sound your neighbor comes rushing over, etc. A much wiser woodworker than I once told me to treat every action with a powertool as an athletic move. This helps you think about your footing, paths that you need to walk to complete the cut, as well as puts you in a stance that enables you to adjust to the unexpected.
Conclusion
I hope with this bit of knowledge, you feel confident to pick up a tool and start building all the projects you can envision. Remember this is a broad overview of a very complex topic. Always seek out information about the specific saw you will use and for goodness sake, read the owner’s manual. After all, parents read the baby books before the baby comes, and babies can’t cut off your fingers.
Stay connected! Be sure to subscribe to Down to a Science— The Official Blog of the Connecticut Science Center and follow us on social media.

Bryan Avery has been working as a STEM Educator at the Connecticut Science Center for 3 years. He develops and facilitates student programming in our labs as well as traveling programs. He holds degrees in Geology and Parks and Natural Resource Management from Hartwick College and Slippery Rock University. Creating exciting new ways for students to interact and engage with STEM is his professional passion. He has a flare for delivering shows to crowds as well as working one-on-one where he pushes students to think deeper and make connections between STEM, their lives, and their community. On his time off, he enjoys playing disc golf, guitar, and being outdoors.